โปรเจกต์เครื่องวัดแก๊สและควันด้วย Arduino และ MQ2 Sensor
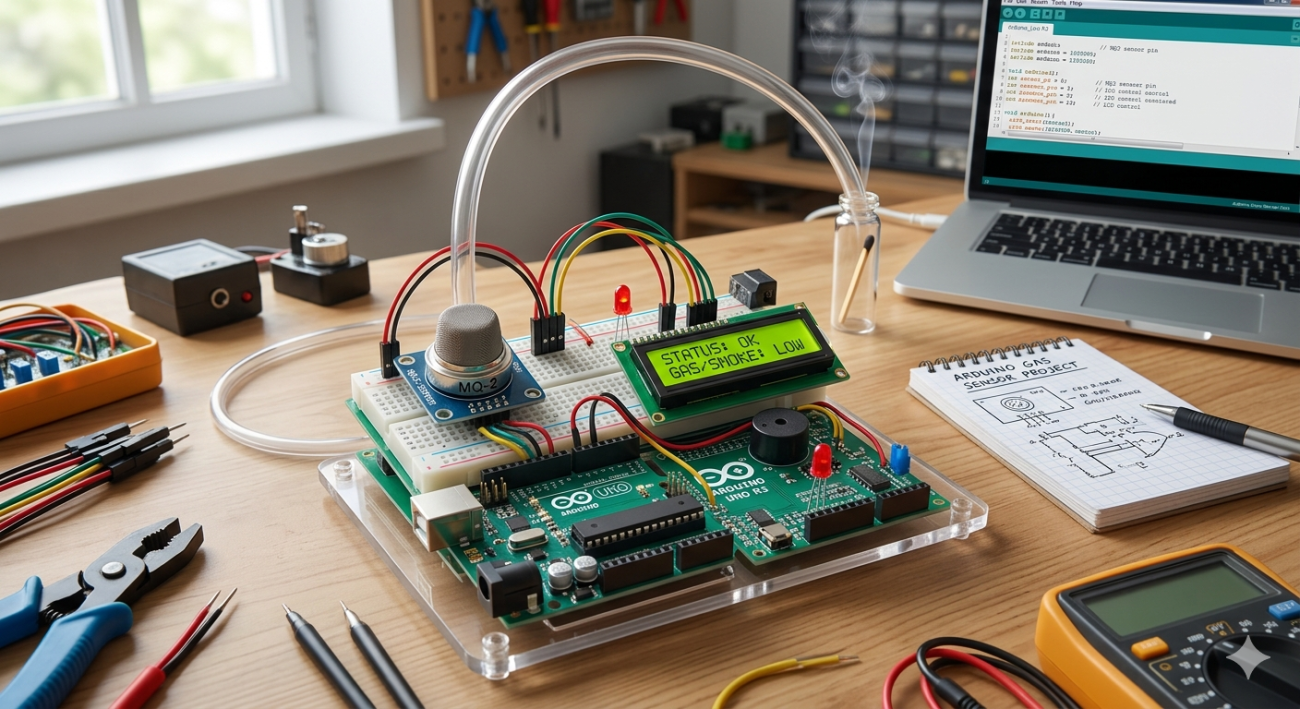
ในโปรเจกต์นี้ เราจะมาเรียนรู้วิธีการเชื่อมต่อ MQ2 Gas Sensor เข้ากับ Arduino เพื่อตรวจจับแก๊สรั่วและควัน ซึ่งเหมาะสำหรับใช้ในบ้านและโรงงานอุตสาหกรรม โดยเซนเซอร์ตัวนี้มีความสามารถในการตรวจจับแก๊สได้หลายประเภท เช่น H2, LPG, CH4 และ CO
อุปกรณ์ที่ต้องใช้
- Arduino Uno R3 – บอร์ดไมโครคอนโทรลเลอร์หลัก https://shopee.co.th/product/243007968/5725582932
- MQ2 Gas Sensor – เซนเซอร์ตรวจจับแก๊สและควัน https://shopee.co.th/product/243007968/4725587212
- Breadboard – แผ่นขนมปังสำหรับต่อวงจร https://shopee.co.th/product/243007968/4725583371
- Jumper Wires – สายไฟจัมเปอร์ https://shopee.co.th/product/243007968/7525582748
- LCD Display (16×2) – สำหรับแสดงค่าความเข้มข้นของแก๊ส https://shopee.co.th/product/243007968/5925582049
วิดีโอสาธิตการทำงาน
ซอร์สโค้ด (Arduino Code)
โค้ดนี้จะทำการปรับค่ามาตรฐาน (Calibration) ของเซนเซอร์ในอากาศบริสุทธิ์ก่อน จากนั้นจะแสดงค่าความเข้มข้นของแก๊ส LPG, CO และควัน (Smoke) เป็นหน่วย PPM ผ่านทาง Serial Monitor และหน้าจอ LCD
#include <LiquidCrystal.h>

// ตั้งค่าพินสำหรับ MQ2 และโหลดความต้านทาน
#define         MQ_PIN                       (0)     // ช่อง Analog Input A0
#define         RL_VALUE                     (5)     // ค่าความต้านทานโหลด (kOhm)
#define         RO_CLEAN_AIR_FACTOR          (9.83)  // ค่าคงที่จาก Datasheet ในอากาศบริสุทธิ์

// ตั้งค่าการสุ่มตัวอย่าง
#define         CALIBARAION_SAMPLE_TIMES     (50)
#define         CALIBRATION_SAMPLE_INTERVAL  (500)
#define         READ_SAMPLE_INTERVAL         (50)
#define         READ_SAMPLE_TIMES            (5)

// ตั้งค่าพิน LCD
const int rs = 12, en = 11, d4 = 5, d5 = 4, d6 = 3, d7 = 2;
LiquidCrystal lcd(rs, en, d4, d5, d6, d7);

// ประเภทแก๊ส
#define         GAS_LPG                      (0)
#define         GAS_CO                       (1)
#define         GAS_SMOKE                    (2)

// ข้อมูลกราฟจาก Datasheet { x, y, slope }
float           LPGCurve[3]  =  {2.3, 0.21, -0.47};
float           COCurve[3]   =  {2.3, 0.72, -0.34};
float           SmokeCurve[3] = {2.3, 0.53, -0.44};
float           Ro           =  10;

void setup() {
  Serial.begin(9600);
  lcd.begin(16, 2);

  Serial.print("Calibrating...\n");
  lcd.print("Calibrating...");

  Ro = MQCalibration(MQ_PIN);                       // ปรับค่ามาตรฐานในอากาศบริสุทธิ์

  Serial.print("Calibration done...\n");
  Serial.print("Ro=");
  Serial.print(Ro);
  Serial.print("kohm\n");

  lcd.clear();
  lcd.print("Done! Ro:");
  lcd.setCursor(0, 1);
  lcd.print(Ro);
  lcd.print(" kohm");
  delay(2000);
}

void loop() {
   float rs_ro_ratio = MQRead(MQ_PIN)/Ro;

   int lpg   = MQGetGasPercentage(rs_ro_ratio, GAS_LPG);
   int co    = MQGetGasPercentage(rs_ro_ratio, GAS_CO);
   int smoke = MQGetGasPercentage(rs_ro_ratio, GAS_SMOKE);

   // แสดงผลทาง Serial Monitor
   Serial.print("LPG: "); Serial.print(lpg); Serial.print("ppm   ");
   Serial.print("CO: "); Serial.print(co); Serial.print("ppm   ");
   Serial.print("SMOKE: "); Serial.print(smoke); Serial.print("ppm\n");

   // แสดงผลบนจอ LCD
   lcd.clear();
   lcd.setCursor(0, 0);
   lcd.print("LPG:"); lcd.print(lpg);
   lcd.setCursor(9, 0);
   lcd.print("CO:"); lcd.print(co);
   lcd.setCursor(0, 1);
   lcd.print("SMOKE:"); lcd.print(smoke);

   delay(200);
}

// ฟังก์ชันคำนวณความต้านทานของเซนเซอร์
float MQResistanceCalculation(int raw_adc) {
  return ( ((float)RL_VALUE*(1023-raw_adc)/raw_adc));
}

// ฟังก์ชันหาค่า Ro ในอากาศบริสุทธิ์
float MQCalibration(int mq_pin) {
  float val=0;
  for (int i=0; i<CALIBARAION_SAMPLE_TIMES; i++) {
     val += MQResistanceCalculation(analogRead(mq_pin));
     delay(CALIBRATION_SAMPLE_INTERVAL);
  }
  val = val/CALIBARAION_SAMPLE_TIMES;
  val = val/RO_CLEAN_AIR_FACTOR;
  return val;
}

// ฟังก์ชันอ่านค่า Rs
float MQRead(int mq_pin) {
  float rs=0;
  for (int i=0; i<READ_SAMPLE_TIMES; i++) {
    rs += MQResistanceCalculation(analogRead(mq_pin));
    delay(READ_SAMPLE_INTERVAL);
  }
  rs = rs/READ_SAMPLE_TIMES;
  return rs;
}

// ฟังก์ชันแยกประเภทแก๊ส
int MQGetGasPercentage(float rs_ro_ratio, int gas_id) {
  if ( gas_id == GAS_LPG ) return MQGetPercentage(rs_ro_ratio,LPGCurve);
  if ( gas_id == GAS_CO )  return MQGetPercentage(rs_ro_ratio,COCurve);
  if ( gas_id == GAS_SMOKE ) return MQGetPercentage(rs_ro_ratio,SmokeCurve);
  return 0;
}

// ฟังก์ชันคำนวณค่า PPM
int  MQGetPercentage(float rs_ro_ratio, float *pcurve) {
  return (pow(10,( ((log(rs_ro_ratio)-pcurve[1])/pcurve[2]) + pcurve[0])));
}
สรุปการทำงาน
เซนเซอร์ MQ2 จะให้ค่าความต้านทานที่เปลี่ยนไปตามความเข้มข้นของแก๊ส โค้ดนี้ใช้สูตรทางคณิตศาสตร์แบบ Logarithmic เพื่อแปลงค่าแรงดันไฟฟ้าที่อ่านได้จากขา Analog ให้กลายเป็นค่า PPM (Parts Per Million) ทำให้เราสามารถมอนิเตอร์ความปลอดภัยในพื้นที่ได้อย่างแม่นยำครับ